Elevate Your Photography with Photeeq Lens Flare: Tips, Tricks, and Creative Insights
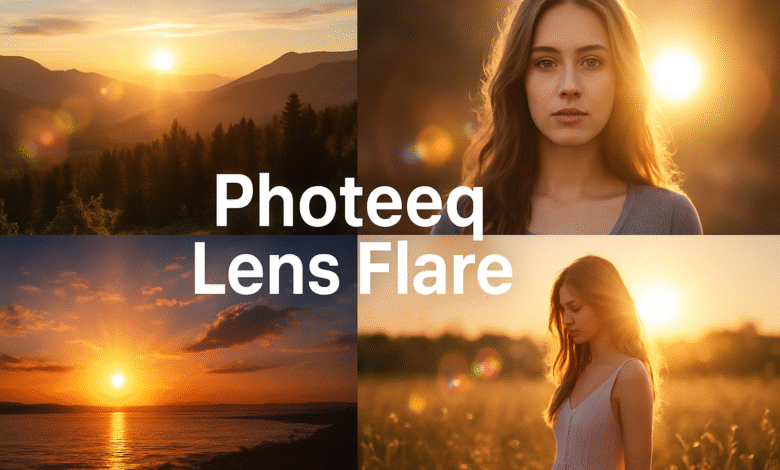
Photography is an evolving art form where imagination and tools combine to create lasting impressions. The beauty of a photo often lies not just in the subject but also in how light interacts with it. One of the most enchanting ways to manipulate light is through lens flare. Thanks to modern tools like Photeeq Lens Flare, photographers can now easily infuse their images with dreamy, cinematic light effects that turn simple moments into breathtaking stories.
In this article, we’ll dive into what makes Photeeq Lens Flare such a powerful photography tool, how it enhances different types of photos, and the best techniques for using it creatively. By the end, you’ll have a complete understanding of how to use lens flare effectively without falling into common mistakes.
Introduction to Photeeq Lens Flare and Its Features
At its core, Photeeq Lens Flare is a specialized software designed to replicate the magical glow of natural light. It enables photographers to add striking sunbursts, glowing halos, and radiant streaks into their photos during post-production. Unlike random, uncontrollable natural flares, this tool allows you to place and adjust flares exactly where you want them, offering complete creative control.
Some standout features include:
-
A library of customizable flare styles.
-
Adjustable intensity, color, and blending modes.
-
Precision tools to ensure the flare complements rather than overpowers the subject.
-
Compatibility with different photography genres including landscapes, portraits, and urban shots.
The versatility of Photeeq Lens Flare makes it a valuable asset for both professionals and hobbyists who want to experiment with light in innovative ways.
How Lens Flare Enhances Photography
Lens flare has the power to change the emotional tone of a photo. When used thoughtfully, it doesn’t just brighten an image—it adds depth, mood, and storytelling potential.
-
Landscapes: A glowing sun flare peeking through trees can transform a simple forest shot into something magical. Colors appear richer, and the sense of atmosphere draws the viewer in.
-
Portraits: A subtle halo behind your subject can evoke feelings of warmth, nostalgia, or even romance. The glow softens harsh lines and makes portraits appear more natural and emotional.
-
Urban Photography: Light bouncing off glass buildings or metallic surfaces creates futuristic, dramatic effects. Lens flare adds energy and character to cityscapes.
-
Macro Shots: Even small details like flowers, raindrops, or insects take on new life when enhanced with carefully positioned flares.
With Photeeq Lens Flare, you can deliberately bring these effects into play and ensure your images carry a professional, polished aesthetic.
Tips for Using Lens Flare Effectively
Every type of photography provides different opportunities for lens flare. Here are some ways to maximize its impact:
-
Landscapes – Shoot at sunrise or sunset, when light is naturally softer. Position the sun slightly outside your frame for a glow that enhances the scene.
-
Portraits – Use golden hour light filtering through leaves or windows. The warmth of a lens flare during this time complements skin tones beautifully.
-
Urban Scenes – Experiment with reflections from glass or water. Photeeq Lens Flare can also mimic these reflections during editing for more precision.
-
Macro Photography – Place small reflective surfaces like glass beads or mirrors near your subject to add natural sparkle. Post-production editing can further refine these effects.
The key is subtlety. A gentle flare often feels more natural and impactful than an overpowering burst.
Creative Tricks for Unique Flare Effects
To go beyond the basics, try experimenting with these creative ideas:
-
Change Your Angles: Moving slightly to the left or right of your subject can drastically alter the flare pattern.
-
Use Reflective Props: Add glass, water, or shiny objects to introduce new layers of light.
-
Play with Aperture: Wide apertures create dreamy, soft flares, while narrow ones give sharper, star-like bursts.
-
Layer Elements: Positioning objects between the light source and your lens can generate flares that frame your subject uniquely.
-
Colored Filters: A simple tinted filter can change the mood of your flare, shifting it from warm golden tones to cool futuristic vibes.
-
Post-Editing Magic: With Photeeq Lens Flare, adjust opacity, blending, and placement after shooting to achieve the perfect result without reshooting.
Common Mistakes to Avoid
Even though lens flare is beautiful, it can easily go wrong. Here are some pitfalls to watch out for:
-
Overuse of Effects: Too much flare distracts viewers from the main subject. Balance is key.
-
Unnatural Placement: Random flares that don’t align with the light source make images look artificial.
-
Overpowering Intensity: Strong, bright flares can wash out details and reduce clarity.
-
Ignoring Post-Processing: Neglecting fine-tuning in Photeeq Lens Flare may result in harsh or unpolished effects.
Avoiding these mistakes ensures your photos retain their artistic value while still benefiting from the magic of lens flare.
Examples of Stunning Photos Using Photeeq Lens Flare
-
Landscape Example: Golden rays piercing through a forest canopy, casting enchanting shadows across the ground.
-
Portrait Example: A couple framed by warm halos of light, giving their image a dreamy, cinematic touch.
-
Urban Example: Sunlight bouncing off skyscrapers, intensified with a touch of Photeeq Lens Flare, turning a normal city shot into an energetic scene.
-
Nature Example: Dew-kissed petals glowing with subtle bursts of light, transforming a macro shot into fine art.
These examples show how this tool can elevate even the simplest compositions.
FAQs about Photeeq Lens Flare
Q1. What is Photeeq Lens Flare used for?
It is used to add realistic or creative lens flare effects to photographs, helping photographers control and enhance light for artistic expression.
Q2. Can beginners use Photeeq Lens Flare?
Yes. The tool is designed with an intuitive interface, making it accessible for both amateurs and professionals.
Q3. Does it replace natural lens flare?
Not necessarily. It complements natural light by giving photographers the ability to enhance or adjust flares when the original capture doesn’t align with their vision.
Q4. What photography genres benefit the most from Photeeq Lens Flare?
Landscapes, portraits, urban photography, and even macro shots can all benefit, depending on how the flare is applied.
Q5. How do I avoid overdoing lens flare?
The best approach is moderation. Use Photeeq Lens Flare to highlight your subject rather than overwhelm it, keeping intensity and placement subtle.
Conclusion: Elevating Your Photography with Photeeq Lens Flare
Lens flare, when used with intention, can transform photographs from ordinary to extraordinary. With Photeeq Lens Flare, photographers gain the freedom to control every aspect of this effect—from intensity to placement—without sacrificing authenticity.
By experimenting with angles, light sources, and post-processing tools, you can create images that feel cinematic, emotional, and deeply engaging. Whether you’re capturing a glowing sunset, an intimate portrait, or a bustling cityscape, Photeeq Lens Flare ensures your creative vision shines through.
In the end, the true magic lies in balance. Use this tool not to overshadow your subject but to enrich the story your photograph tells. With practice, your portfolio will stand out, glowing with the brilliance of carefully crafted light.
Read also: Zryly.com Internet: Transforming Connectivity for a Smarter and Safer Digital World